Saturday, March 28, 2015

"On the Road": An Improved Rolling Rig for UNA

We've got big plans for UNA this year. I feel that most of the detail bugs have been shaken from her. She could stand the extra coats of varnish that never made it in the build. And, added creature comforts like a boat tent, storage bags, oar pads, and reworked mizzen controls should enhance the experience. All of this and more will get a good evaluation on the water soon.

An afternoon last fall.


A final winter project will allow for more to come along. With plans for hauling UNA to places distant, I built a second tier onto her trailer. This "box kite" will allow more boats to roll with us. I can easily carry 3 kayaks high and a small dinghy (Gigi?) slung under the upper cross beams.


The box is constructed from 2x2x1/8 aluminum angle. I purchased 100' in four 25' lengths from B&G Metals east of town. Strong, light, fairly non-corrosive, and easily cut with a hacksaw, the frame went together quickly. 3/8" SS bolts with washers and aircraft nuts hold it all together. Cross braces keep the whole thing rigid and square. 5/16" square U bolts clamp the frame back to the trailer. Its not going anywhere. A second set of lights increase the rig's visibility. At 6' width, it meets the beam of the truck and still has an inch or two to let UNA slip through on the inside. Some left over from fixing up fiberglass edges of another now protects varnished outwales from metal angles. All tolled, not bad for $150, eh?

Looks distorted, but it is square!
Rubber gaskets slipped between the galvanized steel trailer and aluminum frame should deter corrosion between the dissimilar metals. For cushioning the top cross beams I may glue on some closed cell foam. Not sure yet.

A close up: side marker, edging trim and cross braces.
That's enough of the piddling now. The temps are warm enough. Lets go sailing!

Sunday, March 22, 2015

One Ocean Kayak's "Cirrus SLT"

The weather has finally turned for the warmer. We'll get to sail UNA again in the next week or so in the company of a few buddies. Life is looking up. Winter did droned on here, but some boat projects did allow dreaming of new adventures. Too cold for much of anything, the dinghy "Gigi" was hung in the shed to wait for paint, her spot in the garage was taken up by a different build. This one is a stitch and glue kayak for my youngest boy. Perhaps as a set of rolled plans, it was a bit too abstract to qualify as a birthday gift for an 11 year old at the end of last summer. Though I hadn't, and still don't, plan on documenting this project much, yesterday I was struck by some beautiful lines and decided to take a few pics. This little pretty is a 14.5' boat from One Ocean Kayaks. Gigi is more lapstrake in build than stitch and glue. This new addition is a true edge-to -edge s&g boat. The designer, Vaclav Stejskal, has perhaps the best site I've seen sharing detailed performance numbers on kayaks. Much of it is beyond my patience to understand, but I'm glad he has taken the time. His designs are an obvious passion. Honestly, I saw a sweet little boat that appeared well thought out and bought the plans. Vaclav uses his boats, no doubt went through several prototypes, and that care shows in the precision of the full size templates. I frankly was amazed the panel joints could be so tight. 


Stern with hull and moulds.


Half of the fun is figuring out the right method to approach craftsmanship. Jig saw cuts to within 1/32" of the panel cut lines followed by a light pass of a hand plane delivered much better results than aiming to hit the line precisely. Also, mastering how to snake 18 ga. copper wires between deck panels as you close it up took several "fails" before discovering a crisp fish hook shape or "J" was easiest to knit close panels with needle nose pliers. We're now ready to glue the seams and order some glass.

Stern with deck.
Fine lines of the bow.
The hull is made of 4mm okoume ply. The deck is a lighter 3mm. In order to keep the 3mm aligned I used hot melt glue that will be scrapped off after the first pass of epoxy gluing the joints. I'm continually surprised at the shapes one can get from flat plywood.

Wires and hot glue dabs

I'm looking forward to tripping up the James River or down the Appomattox for and overnighter with my boy.

Sunday, February 22, 2015

Oarlock Resolution

 UNA's winter "To Do List" is actually shrinking. Most of the tasks have been subtle refinements like loops for the reefing crinkles along with rings and snap hooks for easier use of that gear. The previously used cunningham hooks dropped out repeatedly when reef lines weren't tensioned. Flailing hooks while raising or lowering the sail are never good. Scratch that off the List.

Dynema loops and bronze snap hook.

Mainsail reefing tack and micro block.
Other improvements like the tent and associated canvas storage bags will keep things neat and functional. One item on the list was not one I relished taking on, but it needed to be done. As a sail and oar boat, one of UNA's strengths should be rowing. After several sessions behind the oars, I finally come to the realization that my little boat needed a better set up. Despite all the testing and fitting of oarlocks in the garage during the build, the in the water test was lacking. At first I attributed the deficiency to my lack of skill (some may still be that). The main reason? The inboard gunwale mounted oar sockets did not get the horns high enough for the oar to clear the outboard edge of the gunwale if one really horsed on the oars and dug deep.
First try: angled sockets.
Angled again.


 The solution was to raise the sockets 1/2-3/4". I did not see an elegant solution with the current angled sockets, so I removed them, fared the gunwale, fashioned new pads from cherry scraps, and fitted standard sockets to them.

New cherry pad temporarily mounted.


Old mounting holes plugged.
 I thought the new sockets would be more locked in if semi-recessed. With nearly 10' oars, there is a tremendous load exerted on this part of the boat. A barbed drill bit and some chisel action helped pare the pad down.

Socket recess.

 The old sockets will go toward the dinghy "Gigi". She hangs in the shed now ready for some sanding and paint. Warmer temps are needed for that.

 Socket pads are now epoxied onto the boat. Varnish coats will have to wait for some warmer couple of days. Epoxy was coated inside the body of the pad as well as inside the hole now in the gunnel for the socket and horn to protrude and weep any water that might otherwise collect.

Installed.
I think this will be a big improvement. The focus can now be on slimming the oar shafts down a tad for a springier pull and thereby lighten the outboard ends for better balanced sculls. Cheers-

Wednesday, February 18, 2015

Boat Hooks to Crochet Hooks

Last Fall my daughter went for her first sail in UNA. She was quick to take note of the 8' long boat hook I made from oak and red cedar. She suggested that I could cut the hooked end of the pole off for her crocheting use! Alarmed at the idea, I defensively I manufactured for her 3 hooks of various sizes mimicking UNA's. I had trouble tossing the hardwood scraps from the build and here they got some use. However, apparently the largest hook wasn't large enough, so a fourth hook made use of what was the bumkin cut off and some oak scraps. I'm now officially out of that business.


Sunday, February 8, 2015

Pushing the Season

An unusual warmth and breeze proved too tempting this morning. Temps were in the mid 60's. I can't recall sailing this early in the year before, unless the Caribbean counts. With winds at 10-12 mph conditions looked perfect. So, we hooked up UNA. Hauling south for about an hour from home got us to Lake Chesdin. Built as a reservoir for Chesterfield County, it has good depth and much of it remains undeveloped shoreline. Some had rock outcroppings with pines reminiscent of Maine.

The SE end of this long water has 2 public ramps separated by a small pier. It all worked quite well. 30 minutes to rig and off we were for a wonderful afternoon. The crystal blue skies and warmth of the sun felt fantastic while slouched in the cockpit watching cormorants, terns, and great heron take wing along the way. An occasional whiff of wood fires only added to the scene. A few coves beckoned for another visit, perhaps for an overnighter.  The lake is fed by the Appomattox River. We sailed in that direction for about 1.5 hrs to weather to turn and reach back for about an hour back to the ramp. There were perhaps a half dozen bass boaters seen along the way. They too wanted to stay in practice I suppose. All was a needed break from the winter doldrums here. Take a look-


Saturday, January 24, 2015

Bag It


About a week ago I purchased 100' of 2x2x1/8" angle to fabricate a second tier on UNA's trailer to haul either the new dink "GiGi" or canoes or kayaks. Last week I hack sawed lengths for horizontals and uprights. This week bolts arrived and today I bolted the pieces together and now a box wraps around UNA. I'm undecided on how I want to cross brace this box, so in usual form I stopped that project and picked up on another.

The new boat tent needed a storage place. The forward locker and lazarette fill quickly with more weather sensitive stuff (sleeping bags, clothes, camera, food, etc.). There happens to be an unused out of the way spot under the side seats port and starboard. This is just perfect for a bag storing the tent. So, my $30 sewing machine builds a 24"x4"x8" bag with zipper and hanging loops. With each project our "sail loft" gains skill. One bag quickly led to a second to "balance" things out. Check 'em out-

Zippered bag with Velcro end strap.

Stainless steel footman loops are mounted under the seat for strapping in the bags.

P & S pair

This was an easy project that suited the tent well and leaves a second bag for miscellaneous items like sail ties, horn, flashlight, or whatever. All the materials are leftovers from the tent making. SurLast, 1" webbing, plastic zipper, and Velcro.


bag installed to port.


Tuesday, January 13, 2015

Post 100! A Solution To Open Boat Shelter

 Two years ago, almost to the day, my daughter suggested that I "blog" my then current building of a cedar strip kayak called the Outer Island. I didn't give it much thought other than I didn't want my efforts here to die on the vine from a lack of ideas or happenings to report. Thus far, we've found a few things to yammer about. It all has become an interesting and entertaining adventure ... well, at least for one person, me.


 And so, I give you post #100, a milestone of sorts, though merely bush league in achievement for many. All in all, it has been enjoyable to share "the process" of messing with these boats.
So, let's have at it.

 Open boat sailing, while minimal, does require some basic necessities, food and shelter being primary. Especially, if one is to extend one's cruising grounds. However, as simple as putting a tent or awning could be on such boats, you would not believe the countless solutions out there. Some are quite clever, but most are Rube Goldberg contraptions giving no thought to the frequent, and at times, surprise blow ups on the Chesapeake Bay, or elsewhere for that matter. The proverbial middle of the night fire drill is never welcomed. Sure, you could pitch a tent ashore. In fact, sometimes that may be more prudent. Yet, to anchor one's boat in a secluded cove can deliver a special satisfaction and comfort if properly done. Camping ashore can leave you wondering if your probable trespass will be discovered. Snakes, or worse, could add to the on shore fun too.

Study model

Initial sketching

 So, a tent for UNA seems necessary. Starting with the KISS principle and with my model in hand we fashioned a few scenarios at small scale. A list of desired design features came to mind:
  1. Quick and easy set up.
  2. Compact for storing.
  3. Room for 2 persons albeit cozy in size.
  4. Reduced windage for a calmer ride in the event of a blow.
  5. Ready access to the anchor rode.
  6. Double as an awning when shade is welcomed at anchor.
 Our first attempt took the fly from our shore tent and fixed that across the cockpit. It was a close fit, but just shy of overlapping the gunwale. Covering only a portion of the cockpit, it had too much windage IMHO. (Some info previously shown discussed here).
Rain fly applied.


 A more obvious option strung a ridge line between the masts for throwing over a tarp. This one was studied quite a bit, but it too gave more windage than I desired and no matter how hard I strung the ridge it still sagged appreciably thereby hindering interior volume where needed. 

 A third scenario employed house wrap and bowed battens temporarily to make a roomy "cave," but setting it all up looked to be a pain and while you could use tent poles instead, the pieces seemed too many. Limited storage of "stuff" on a small boat really makes itself evident. Several cruises are still needed to pare down what's already lugged along.
Crew under bowed tent.
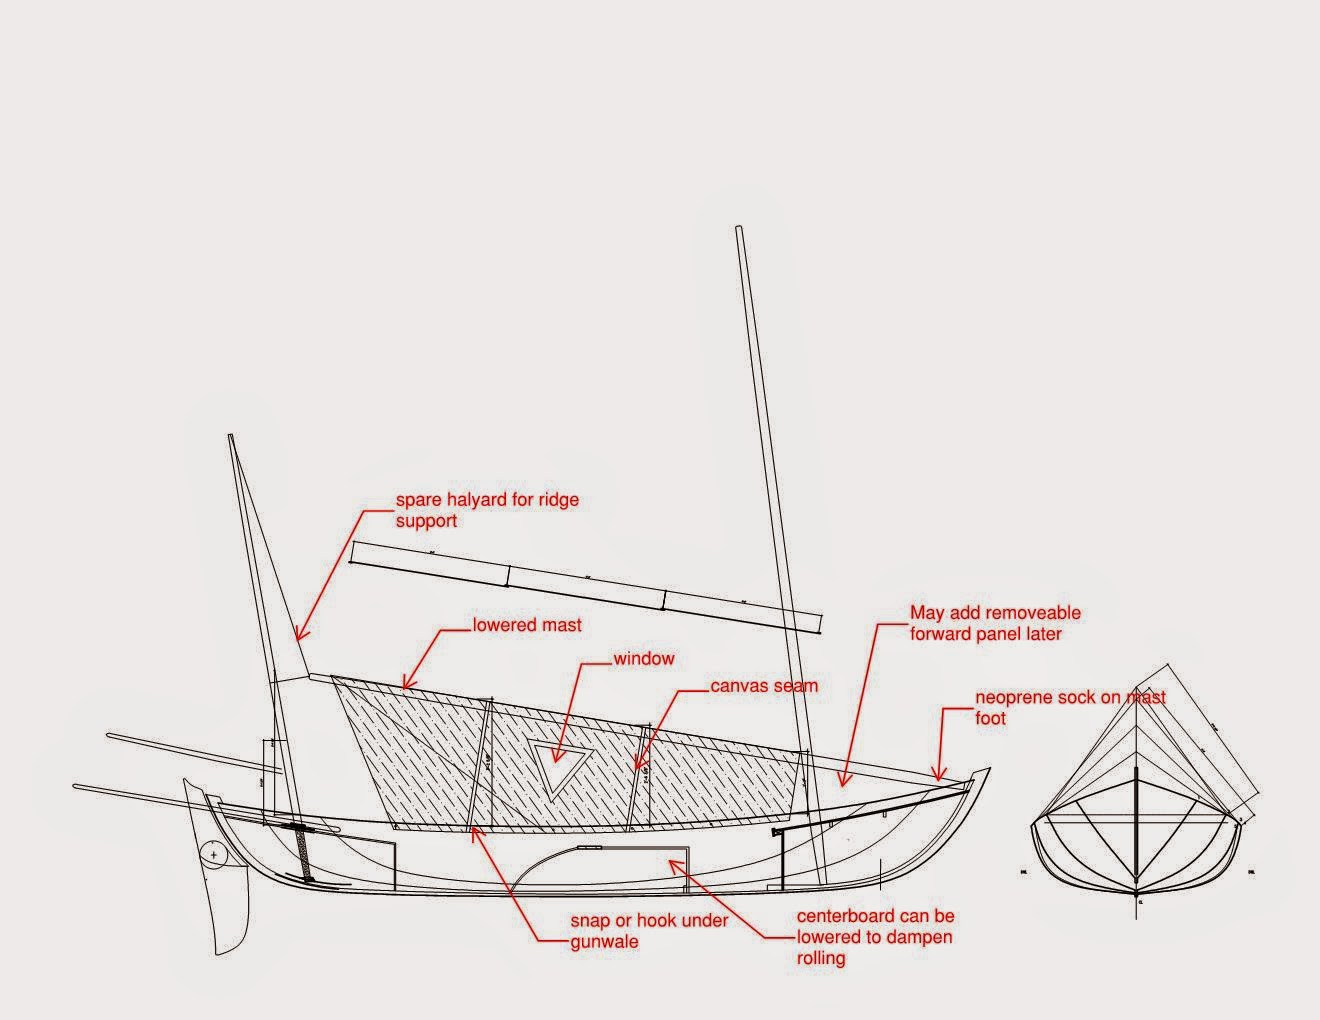
 A final alternative used the light main mast in a lowered position serving as a ridge beam.  If the weather really got howling, you don't want the mast up anyway. Though the mast may help dampen  rolling, a lowered centerboard will suffice to do the same. Another quick mock-up showed particular promise. Drafting the solution helped with a cloth order of Sur Last. This is a lighter alternative from Sunbrella and is less expensive to boot. The material has served well in the building of UNA's sail bags and spar covers. While not quite as water repellent as Sunbrella, Sur Last did pass a soaking test from the garden hose.

Tyvek and mast ridge pole with the happy crew.
As a better illustration, here is a drafted version:


 Additional canvass or insect netting panels may be added fore and aft at a later time if needed. Otherwise, a nice wedge is formed for easy weathercocking. This will have benefits for ventilation as well as riding a blow.

the "weathervane" mock-up.

view from aft.

"escape" corner pulled back.
 Now the project is near completion. We've good slope to shed rain, ample height for relaxing and cooking in the aft cockpit. The studying took quite some time, but the build actually went rather quickly.


 Some tugging here and there will yank the wrinkles out. The lower edges are secured by Velcro straps through footman loops mounted under the gunwale. No knots! It is hard to see in these pics, but there is a "D" ring sewn in the middle of the ridge if for some reason leaving the main mast up is required. 

Straps every 2'. Four per side.

Velcro strap close up
stainless footmans loop.

 The footman loops are 2' on center and may double as attachment points for a boat cover down the road. For now, UNA sleeps in a garage.

 The heal of the mast wears a small neoprene sock to prevent scaring of the deck. The tent ridge is 1" tubular nylon webbing with a loop to drop over the stem (again, no knots).

mast sock and ridge webbing loop.
 The mast's after end hangs from the mizzen mast by a secondary halyard run through a SS ring secured by a loop of Dyneema. Once the ridge webbing and edges are secured, raising the high end of the mast tightens the whole affair.

A secondary halyard from mizzen mast raises ridge pole.
A soft Dyneema loop and SS ring make for the second halyard.
Lastly, a light 1/8" Dacron line was threaded through a sleeve in the bottom edge to snug the skirt in. Wind and/or rain should not get through here.

Snugged canvass edge with light continuous line.

 With a furled mizzen, most of the windage is held aft. UNA should ride well with this setup. The necessity for any end panels will be evaluated in field later. No doubt a removable shroud forward may be added later. The window shown in the drafted elevation might also be nice. In the field testing is needed now. How long until Spring arrives?

 The whole shebang bundles nicely. We'll sew a sack for storage later too.

tent bundled.
And there you have it, number 100 in the bag. Thanks for following along.