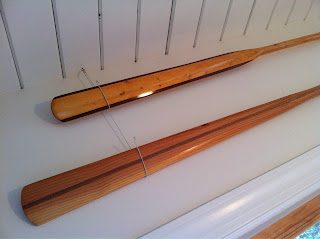
This is actually my 3rd attempt at paddle making. The first was hacked out of a knotty white pine 2x4. It was to be practice and never to see the light of day, but it turned out to be quite functional. Coating the loom (center grab area) with polyurethane (or varnish)was a mistake as the coating promotes blisters. I say hacked, because this was before I read up on the proper tuning of a block plane. I assumed a brand new plane was sharp. I fairly bludgeoned the stick to compliance and had to trim the edges in mahogany to cover major errors.
 |
| 1st at top. 2nd at bottom. |
 |
| 1st & 2nd up close. |
Not too discouraged, I happened to see a nice stud grade spruce 2x4 lying in the rack at the big box home store and snagged it for $1.75. With a sharpened plane, this go was much more to my liking. It is finished with a soup of equal; parts pine tar, mineral spirits and linseed oil. Stinks, but the smell grows on you, and perhaps becomes a part of you. There is a spline of mahogany epoxied on this one. Weight: 2 lbs 10 oz. and straight.
Now to #3: I wanted a nicer and hopefully lighter paddle. I also added an inch to the previous 87" stick. Strips of 3/4" x 1 1/2" western red cedar is laminated with Titebond III waterproof glue to 3/8" x 1 1/2" sugar pine to approximate the overall shape at 6 pounds.
 |
| round 3 in the rough. |
There are some knots I expect to be removed in the shaping process. Paddle is over 6 lbs at this point. Heavy. Glue seems to be super hard and leaving a scrap in a cup of water showed no glue discoloration or softening. Certainly less expensive than epoxy. The drips were scraped and the whole assembly run through my old Ryobi 10" surfacing planer to 1 7/16" thickness. At this point it more represents a frat paddle. "thank you sir! may I have another?!" you either know the reference, or you don't. If not, consider yourself lucky. Now the the real shaping begins.
 |
| fraternity paddle |
The edges were cut with a Japanese saw. I used a circular saw on the flats. My Workmate portable bench secures things well. Use scraps of wood in the jaws to avoind dinging the paddle itself. Cedar is soft. The hand plane trims the cuts to a fair line.
 |
| one edge cut. |
 |
| # 3 sanded & ready for the "soup". |
At 2 lbs and 10 oz, this third try weighs a whole pound less than #2. I may have to test it out this weekend. The blades are thinner and should slice the water better. The site below notes less turbulence with a more oval cross section than a flat or squarish section. Mine is between the two for quick execution. We'll see how it compares to #2 which is more "flat". In the meantime a coat of soup will be applied everyday. I just slop it on with a clean rag, let it soak in for an hour or two, wipe off any drips, and re-coat in 6-8 hours.
For more in-depth on this style of paddles:
www.seacanoe.org/grnpadle.htm
 |
| shoulders on #3 |
3 coats of "soup" and the satin finish is starting to come through. I know of one fellow who has pitched using varnish products and wipes on this mix on his brightwork at the beginning and end of each season. It is thin and it does appear to soak in well. Each successive coat deepens the hand rubbed look.
Saw THIS this morning. The pain of those blips are starting to melt away. After a few coats of varnish, I expect the exasperation will be gone. I have it on good report from Barry Long that these blemishes will fade as the varnish (not applied yet) and wood darken. I trust he's correct and welcomed the comment.


No comments:
Post a Comment