Two years ago, almost to the day, my daughter suggested that I "blog" my then current building of a cedar strip kayak called the
Outer Island. I didn't give it much thought other than I didn't want my efforts here to die on the vine from a lack of ideas or happenings to report. Thus far, we've found a few things to yammer about. It all has become an interesting and entertaining adventure ... well, at least for one person, me.
And so, I give you post #100, a milestone of sorts, though merely bush league in achievement for many. All in all, it has been enjoyable to share "the process" of messing with these boats.
So, let's have at it.
Open boat sailing, while minimal, does require some basic necessities, food and shelter being primary. Especially, if one is to extend one's cruising grounds. However, as simple as putting a tent or awning could be on such boats, you would not believe the countless solutions out there. Some are quite clever, but most are Rube Goldberg contraptions giving no thought to the frequent, and at times, surprise blow ups on the Chesapeake Bay, or elsewhere for that matter. The proverbial middle of the night fire drill is never welcomed. Sure, you could pitch a tent ashore. In fact, sometimes that may be more prudent. Yet, to anchor one's boat in a secluded cove can deliver a special satisfaction and comfort if properly done. Camping ashore can leave you wondering if your probable trespass will be discovered. Snakes, or worse, could add to the on shore fun too.
 |
| Study model |
 |
| Initial sketching |
So, a tent for UNA seems necessary. Starting with the KISS principle and with my model in hand we fashioned a few scenarios at small scale. A list of desired design features came to mind:
- Quick and easy set up.
- Compact for storing.
- Room for 2 persons albeit cozy in size.
- Reduced windage for a calmer ride in the event of a blow.
- Ready access to the anchor rode.
- Double as an awning when shade is welcomed at anchor.
Our first attempt took the fly from our shore tent and fixed that across the cockpit. It was a close fit, but just shy of overlapping the gunwale. Covering only a portion of the cockpit, it had too much windage IMHO. (Some info previously shown discussed
here).
 |
| Rain fly applied. |
A more obvious option strung a ridge line between the masts for throwing over a tarp. This one was studied quite a bit, but it too gave more windage than I desired and no matter how hard I strung the ridge it still sagged appreciably thereby hindering interior volume where needed.
A third scenario employed house wrap and bowed battens temporarily to make a roomy "cave," but setting it all up looked to be a pain and while you could use tent poles instead, the pieces seemed too many. Limited storage of "stuff" on a small boat really makes itself evident. Several cruises are still needed to pare down what's already lugged along.
 |
| Crew under bowed tent. |
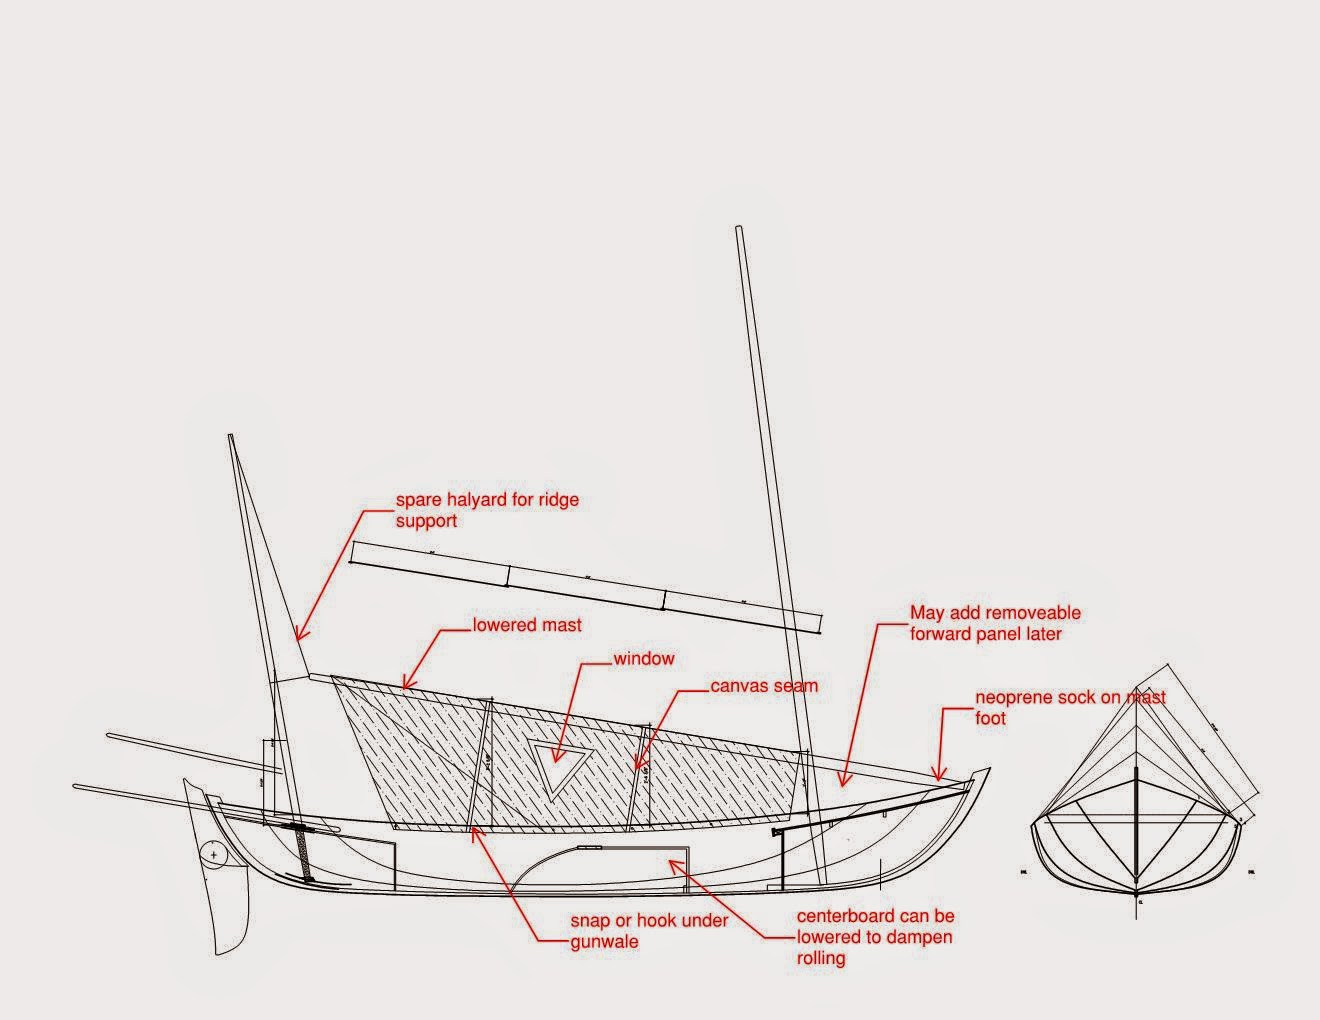
A final alternative used the light main mast in a lowered position serving as a ridge beam. If the weather really got howling, you don't want the mast up anyway. Though the mast may help dampen rolling, a lowered centerboard will suffice to do the same. Another quick mock-up showed particular promise. Drafting the solution helped with a cloth order of
Sur Last. This is a lighter alternative from Sunbrella and is less expensive to boot. The material has served well in the building of UNA's sail bags and spar covers. While not quite as water repellent as Sunbrella, Sur Last did pass a soaking test from the garden hose.
 |
| Tyvek and mast ridge pole with the happy crew. |
As a better illustration, here is a drafted version:
Additional canvass or insect netting panels may be added fore and aft at a later time if needed. Otherwise, a nice wedge is formed for easy weathercocking. This will have benefits for ventilation as well as riding a blow.
 |
| the "weathervane" mock-up. |
 |
| view from aft. |
 |
| "escape" corner pulled back. |
Now the project is near completion. We've good slope to shed rain, ample height for relaxing and cooking in the aft cockpit. The studying took quite some time, but the build actually went rather quickly.

Some tugging here and there will yank the wrinkles out. The lower edges are secured by Velcro straps through footman loops mounted under the gunwale. No knots! It is hard to see in these pics, but there is a "D" ring sewn in the middle of the ridge if for some reason leaving the main mast up is required.
 |
| Straps every 2'. Four per side. |
 |
| Velcro strap close up |
 |
| stainless footmans loop. |
The footman loops are 2' on center and may double as attachment points for a boat cover down the road. For now, UNA sleeps in a garage.
The heal of the mast wears a small neoprene sock to prevent scaring of the deck. The tent ridge is 1" tubular nylon webbing with a loop to drop over the stem (again, no knots).
 |
| mast sock and ridge webbing loop. |
The mast's after end hangs from the mizzen mast by a secondary halyard run through a SS ring secured by a loop of Dyneema. Once the ridge webbing and edges are secured, raising the high end of the mast tightens the whole affair.
 |
| A secondary halyard from mizzen mast raises ridge pole. |
 |
| A soft Dyneema loop and SS ring make for the second halyard. |
Lastly, a light 1/8" Dacron line was threaded through a sleeve in the bottom edge to snug the skirt in. Wind and/or rain should not get through here.
 |
| Snugged canvass edge with light continuous line. |
With a furled mizzen, most of the windage is held aft. UNA should ride well with this setup. The necessity for any end panels will be evaluated in field later. No doubt a removable shroud forward may be added later. The window shown in the drafted elevation might also be nice. In the field testing is needed now. How long until Spring arrives?
The whole shebang bundles nicely. We'll sew a sack for storage later too.
 |
| tent bundled. |
And there you have it, number 100 in the bag. Thanks for following along.

Eddie- it looks really smart. I went through a similar evolutionary process with my boat. I like your use of loops under the gunwhales. Can you talk a little more about how the main mast hangs off the mizzen? How heavy is the main? Seems that it would put some strain on the mizzen mast and would move around... Love that you're using such minimal numbers of parts.
ReplyDelete-Bruce
Hey Bruce,
ReplyDeleteI just viewed your "Sew What" blog. I like the sketches!
My mast is birdsmouth constructed. My design calcs using Douglas Fir put a solid mast at 33-35#. Mine came in at 19-20# ( I did thicken the mast walls). So, its easy to lower, especially while standing in the boat. A neoprene sock is placed on the heel. There a picture of the soft Dyneema loop with ring for second mizzen "sheave". A light halyard hoists the mast end up easily after the Velcro straps are attached. No real strain on the mizzen mast either. It is also birdsmouth as is the yard. Booms are solid as they should be. The hardest part was deciding to cut the lower edge off! You can't put it back. I measured many times and eventually went for it. If I leave the main mast up and hoist from the middle ring, the tent works fine, but isn't as nice looking. I intend to certainly add a forward skirt, but I want it simple too and haven't decided the method. I have gotten partial to Velcro in these applications. I can "rip and roll" from any side or corner.
Later-
E